
Do you get bored of the standard scrolling patterns? These scrolling techniques will make your scrolling experience more enjoyable. These tips will make scrolling more relaxing and enjoyable. These are the most common scrolling patterns: Stars, Geometric plane patterns and infinite scrolling. These techniques can be used for any website or smartphone that you are stuck on. You'll be amazed at the results.
There are endless scrolling possibilities
Infinite Scrolling has many negative consequences for the user experience. For starters, it makes it difficult to bookmark a location. Similarly, if a user leaves the website and returns later, they'll lose their progress and have to scroll down again. Inability to locate their location will cause users irritation. This negatively impacts the overall website experience. It is important that designers eliminate footers from their websites.
Infinite scrolling is a user experience problem that impacts both mobile and web interfaces. Users form expectations and habits that are tied to their experience on a site. The best solution is to make your content available to all users and to allow users to manually load more content. Mobile users are prone to losing track of where they have been. This is particularly important.
Parallax effect
The Parallax effect is an increasingly popular contemporary design technique. It creates an illusion that depth is present, which can increase visitor interest and improve their time on site. Parallax scrolling does not have to be horizontal. Parallax scrolling can be used to highlight specific parts of the page using diagonal effects. This effect should be balanced with lots of blank space. It's fun to create but don't overdo it!
Parallax scrolling is a great addition to any web design. Parallax scrolling is used by websites that sell fresh fruits and vegetables to show the speed differences between sections. Users can view product development and before-and-after images with ease by clicking on an image that appears on the screen while the rest of the page is static. This effect is particularly effective if you want to give users the feeling that they have control over the story.
Geometric plane patterns
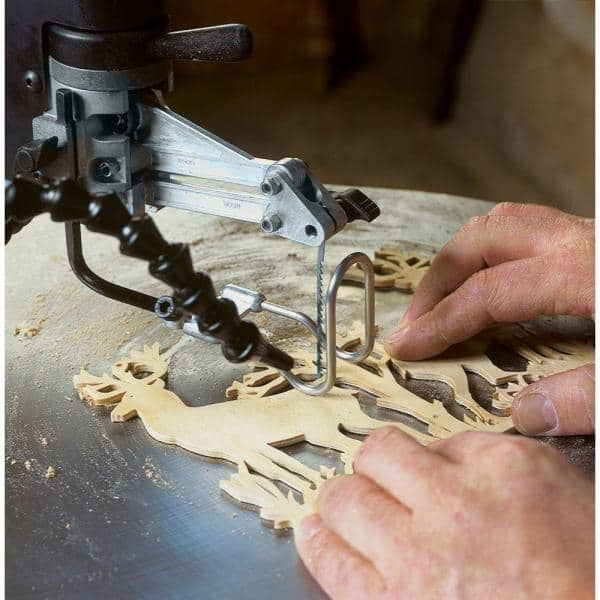
Remember to include both positive and negative spaces when creating scrolling patterns. Negative space refers the areas of wood that have been removed, while positive space refers the remaining portions. It is important to create a geometric plane design by bridging between negative and positive space. Geometric planes use standard geometric shapes to define feather groups, body part, and other distinct areas.
You might be looking for creative ways to spice up your images using geometric patterns. You can even make them mascots! Apps can combine several images to make a fun and unique experience. Geometric patterns give your images a personality and make them stand out. Highlights and shadows are great tools for drawing attention to certain parts of your images.
Stars
A star is the best pattern to start with. This pattern is simple and not difficult to use. This pattern is an excellent way to start to make basic curved cuts, and then move on to more complicated patterns. This is an excellent way to recycle scrap wood. Knowledge of Axminster has a free printable template to help you make this pattern. This page also links to several scroll saw patterns, such as a Christmas star drawing template.
FAQ
How much should a hobbyist invest to get started?
A lot of capital is required to purchase the necessary supplies and tools if you want to start your own woodworking shop. A good place to start would be by buying a small table saw, drill press, circular saw, jigsaw, and sanding machine. These items are affordable so you won’t break the bank.
This is a job that I can make a living from.
Yes! Many woodworkers have this ability. According to the U.S. Bureau of Labor Statistics in May 2012, the median annual income for woodworkers was $34,000 This is more than the national average of 31,000 per annum.
Do I need to be a genius to succeed in woodworking?
No. Woodworking is not difficult. You can create beautiful pieces of art by learning how to use simple power tools.
Where can I find my woodworking tools?
You can find everything you need in many places. You could shop at your local hardware store or go online to Amazon.com.
You might also consider flea markets and garage sale for any old furniture or other materials you could reuse.
How much should a skilled woodworker earn per hour?
The hourly rate for a professional Woodworker will vary depending on many variables, such as experience, skill level and availability.
An average hourly rate for skilled woodworkers ranges between $20-$50.
A less skilled woodworker might charge as low as $10 per hour.
How can I keep my shop organised?
First, make sure you have a designated space for tools storage. Keep your tools away from dust and debris, so they stay sharp and ready to work. Use pegboard hooks to hang tools and accessories.
Statistics
- The best-paid 10 percent make $76,000, while the lowest-paid 10 percent make $34,000. (zippia.com)
- Woodworkers on the lower end of that spectrum, the bottom 10% to be exact, make roughly $24,000 a year, while the top 10% makes $108,000. (zippia.com)
- Average lumber prices rose about 600 percent between April 2020 and May 2021. (familyhandyman.com)
- If your lumber isn't as dry as you would like when you purchase it (over 22% in Glen Huey's opinion…probably over 10-15% in my opinion), then it's a good idea to let it acclimate to your workshop for a couple of weeks. (woodandshop.com)
External Links
How To
How to make wood joints
This tutorial will help you join two pieces of wooden together. We will use the "pockethole joint," which means that we drill holes in the wooden pieces and then glue them together. This method works great if your wood is straight and smooth. Dowel joinery might be a better option if your wood is not straight or flat. These are the steps
-
Drill Pocket Hole Joints. To start, measure and mark where you want to put the pocket hole joint. Use a jigsaw or handheld drilling machine to drill 3/8 inch deep holes at the ends of each wood piece.
-
Sand Smooth. The wood's edges can be sanded to prevent splitting.
-
Glue Together. Apply glue to both sides of the wood. Allow the wood to rest for five minutes before clamping it together.
-
Fix the Pieces together. After the glue has dried properly, clamp the pieces together to make sure they are flush.
-
Trim Joinery. Trim the excess wood around the joint after the glue has dried completely.
Be sure to leave enough space between each piece so that they can be turned inside-out.