
If chip carving has ever been something you've wanted to do, you know how difficult it can be. There are many methods and styles to choose from, but which one will you prefer? What tools do you need? I will be sharing my tips and tricks for carving chips. There are many key ingredients to successful chip carving, no matter how traditional your style.
Traditional
Chip carving is one form of decorative woodcarving that dates back to the beginning. This requires a straight-edged or offset knife. Chip carving involves making many small triangular incisions in wood to create a pattern. This art form was developed simultaneously in several countries and dates back over 1000 years. Because of its widespread popularity, the designs were often so similar across nationalities that it was impossible to discern one from another.
As wood carving became more common, skills were passed on from generation to generation. Chip carving was used in Sweden to decorate furniture. Schools were eventually established to teach this art. Modern chip carvers have benefitted from the skills and knowledge of centuries-old carvers. Through generations, the knowledge and experience of carvers was passed on from apprentice to student. It is a process that lasts a lifetime and continues to this day.
Form free
You've come to right place if you've ever wanted to learn chip carving. Murray Taylor provides a DVD showing you how to create both freeform or geometric carvings. It is an excellent introductory project with plenty of information. NTSC and English formats are available. The DVD can be purchased in stereo or widescreen. Artisan Media Ltd. is owner of the DVD. The DVD can be downloaded in MP4 format on Windows and Mac computers.
Geometric chip carving is based on lines, circles, triangles and circles. You can combine different styles with this technique, which allows you to create unlimited patterns and shapes. This type of chip carving is also known as free-form chip carving. No matter what shape your chips are, they will add beauty to any room. A free-form method of chip carving is a great way to incorporate several different techniques into one piece.
Techniques
Chip carving has been practiced for hundreds of years. Examples can be found in countless countries throughout the world. For example, in South Pacific Islands, chip carving can be found on ceremonial tool handles and boat paddles. These carvings were probably done using bits and pieces of bone, seashells, or shark teeth. This book demonstrates how to use a variety of chip carving techniques to produce stunning designs.
Chip carving is easy if you know how to follow a few simple techniques. First, you need to learn how to carve the fine triangular shape. This pattern is easy and straightforward to understand. To carve this pattern, you simply need to carve various triangles and repeat this process over again. However, this does not mean that your chip carving has to be boring - by varying the triangles, you can create a range of wonderful patterns.
Tools
Lora S. Irish's free online seminar will show you how to chip carve basic steps. She shows you how to use a variety of carving tools and materials, such as a chip, stab, and detail knife. Irish also teaches you how to use different wood carving tools during this seminar. The list below will help you choose the right tool to suit your carving needs. These tools can create simple shapes and designs. Or, you can work more intricately to create more intricate designs.
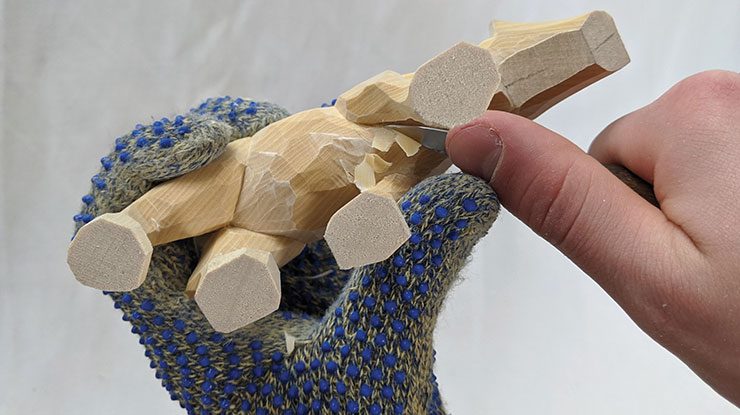
Special geometry is required for chip carving knives. It is one-half inch in length and has an angled back edge. This makes it possible to make precise incisions. A sharp point is essential to ensure that edges meet perfectly. You can also get chip carving knives made out of stainless steel. They have a sharp tip. A chip carving knife should be sharp and sharp enough to slice a bit of wood.
Getting started
When getting started with chip carving, you must first learn about its methodology. The process will vary depending on what type of carving you are doing. To ensure accuracy, it is important to be familiar with the following principles. The method of chip carving involves cutting a fine pattern in the wood. Here are some steps to help you create your first chip-carving.
It is very important to sharpen a chip carving knife. The blade of the chip carving knife will have bevels on each side, indicating that it is a primary chip carving knife. The sharpening tool is shaped like a small diamond and can produce sharp edges. It should be placed at a 10-degree angle. It will also sharpen your chip carving knife as well as your chip carving tool simultaneously.
FAQ
Which material would you recommend for woodworking lessons?
Start with softwoods such as pine and poplar. When you feel confident with these two, move on towards hardwood.
Do you know anything more about woodworking?
It is easy for people to overlook the work involved in furniture making. Finding the right wood for the project is the hardest part. It is difficult to choose between the various types of wood.
Another issue is that wood does not have the same properties. Some woods will warp and others will split or crack. Before purchasing wood, you should consider these factors.
How do I get started as a woodworker?
Woodworking requires patience and practice. It takes time to learn how to use all the different tools and techniques required for woodworking.
There are many types of woodworking equipment on the market today. Some people prefer to use power tools while others prefer manual tools.
The choice is yours, but you must ensure you choose the right tool for the job. A basic set of hand tools may be enough for you if your skills are not yet developed.
You could also try learning how to use a router which is used to cut intricate shapes into wood. You can find these at most hardware stores.
How often should I purchase new supplies?
Some tools will need to be replaced over time. You'll need to sharpen your hand tools regularly if you use them. And if you're using power tools, you'll need replacement parts periodically. Spread your purchases over several months to avoid purchasing too many items at once.
How can my shop be organized?
To keep your workshop tidy and organized, you should first create a place for tools storage. Your tools will stay sharp and ready to go when they are free from dust and debris. Use pegboard hooks to hang tools and accessories.
Statistics
- If your lumber isn't as dry as you would like when you purchase it (over 22% in Glen Huey's opinion…probably over 10-15% in my opinion), then it's a good idea to let it acclimate to your workshop for a couple of weeks. (woodandshop.com)
- The best-paid 10 percent make $76,000, while the lowest-paid 10 percent make $34,000. (zippia.com)
- Overall employment of woodworkers is projected to grow 8 percent from 2020 to 2030, about as fast as the average for all occupations. (bls.gov)
- The U.S. Bureau of Labor Statistics (BLS) estimates that the number of jobs for woodworkers will decline by 4% between 2019 and 2029. (indeed.com)
External Links
How To
How to use a handsaw correctly
To cut wood into pieces, a handsaw is used. The most common types of hand saws are circular saws, jigsaws, table saws, band saws, saber saws, crosscut saws, miter saws, and rip saws. A hand saw is made from metal or plastic and cuts materials such as wood, plastics and metals.
The best thing about a handsaw is the ability to make precise cuts at all angles and without needing adjustment. The blades can also be sharpened easily, which is not possible with power tools. There are also some drawbacks. You must be careful when transporting them, as they can be heavy and bulky. It is possible to injure or damage your own body if the instructions are not clear.
There are many ways that you can use a handsaw. When you are cutting, your hands should be kept away from the blades. If you don't, you might get hurt. Holding the saw in your hands, place your thumbs on the handle and your thumb at the blade's top. This will prevent you from accidentally touching the blade.
You should not place anything underneath the wood you are cutting with a handsaw. Doing so could cause the blade's surface to become uneven. Always check the area where you want to cut before starting. Check for nails, screws and other objects underneath the wood.
You should always wear safety goggles when working with a hand saw. They prevent dust from getting into your eyes, making it easier to see what you're doing. Safety glasses can also be useful as they protect your skin from flying debris.
If you plan to work with a hand saw, you must first learn how to operate it safely. You can then practice until you are confident enough to cut things. Once you are comfortable with the basics, you will be able cut almost any material.