There are many ways to turn sand. However some turners prefer a slow speed. You need to be aware that sandpaper tends to wear down over time, so you must increase the pressure in order for the wood to be cut. This causes heat to build up and leaves the wood with embedded scratches. This article will give you some tips on how to get the best out of your lathe.
Sandpaper made of dull material can cause lathe sanding to be less effective
This overview will help you understand the impact of dull sandpaper. It can make your work more difficult by causing the sandpaper or jaws to contact the chuck. This causes poor quality finishes and inefficient sanding. To avoid this, you should buy sandpaper only from specialty shops. It's quite remarkable.
Dry sanding can easily tear, which can lead in uneven results. The work piece could fly upwards and land on the operator's arm. It could also get caught against the sanding surface, and be sucked into a machine. Sandpaper that is too dull can affect lathe sanding
Use finer grits
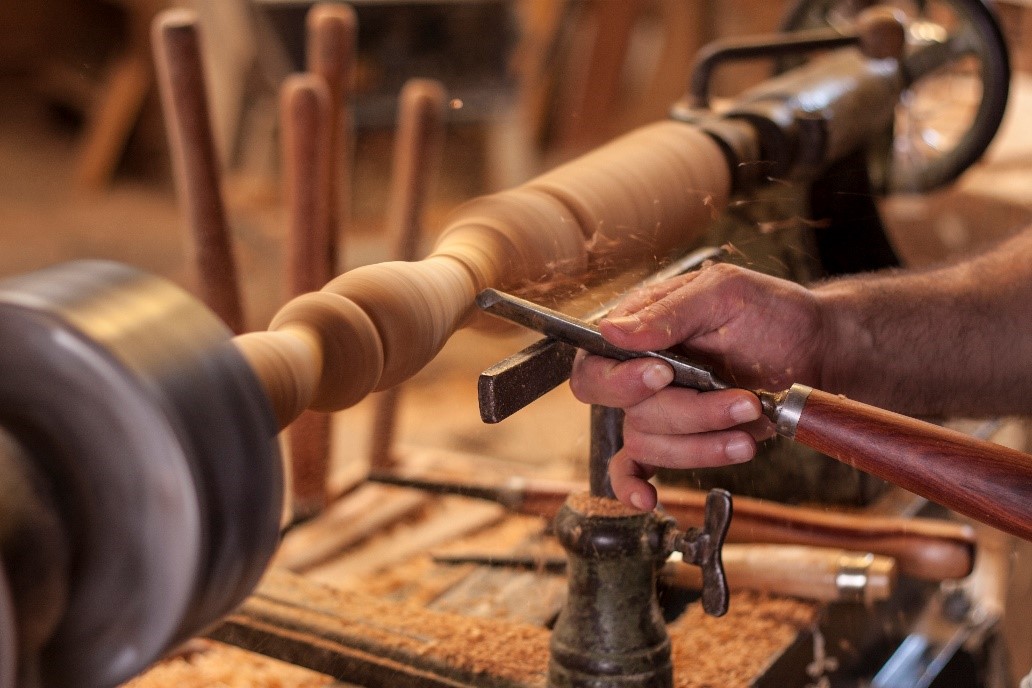
A lathe can be sanded with progressively finer paper grits to achieve a smoother surface than one made from coarser papers. Depending on the material you're working in, you have the option to choose from 100, 150, or more. Each grit repairs the scratches created by the previous, and the next removes them. 400 is the final grit. Many turners recommend using hand sandpaper for the final sanding step, using the grain of the wood. The sanding can also be done with compressed air.
The coarser grades of sandpaper remove the coarser grades. However, it will leave behind a cloudy sawdust or grind on your turning. Using finer grits will help you get rid of the finer scratch marks. Finer sandpapers are more effective at removing large amounts of wood and removing any small imperfections.
Use lathe sandpaper to avoid clogs

To avoid clogs, it is important to select the right grit for the job. Ask the experts at your local hardware shop for help. You can also get variety packs which work well with multiple grits. Listed below are the different types of sandpaper and their grit numbers. Aluminum oxide sandpaper makes a great choice for general sanding, while synthetic sandpaper suits woodworking better.
Floor finish is another common cause of clogs. Resins and varnishes can leave sticky residue on the floor, which can lead to clogs. It is important to choose the right type of sandpaper according to your finish. For light-duty jobs, it is best to use sandpapers of a higher grade. Finer sandpapers will work better for heavier-duty tasks. But they are more likely than not to clog or cause more scratches.
Using a sanding belt holder
A sanding belt mounted on a lathe reduces the risk of hand sanding and allows for safe, efficient sanding. The sanding belt holder attaches to the tool-case turbines on conventional lathes and allows for the rotation of the workpiece. They are available in 25mm and 50mm widths.
If your workpiece is long or requires extra support, you can use a roller stand or worktable extension to provide additional stability. The tilt lock should not be in contact with the belt. After you have installed the sanding holder, you are ready to start sanding. When you are satisfied with the assembly, you will be able to use the extension on the worktable to sand every surface of your workpiece.
Use a sherpa to sand the lathe
If you've ever used lathe sanders, you know how easy is it to slip a disk from the machine and lose it. A donut can be used to change the abrasive disks. It can be attached with masking tape to the tailstock. If you are using a donut, ensure that the backing is facing out. Mark the abrasive rim halfway between its center and the edge. Use a thin cutting tool to cut the disc.
FAQ
What is the difference in plywood and particleboard?
Plywood is made of layers of wood that are pressed together under pressure. Plywood is available in a variety of thicknesses. It is often used to make cabinets or flooring. Particle board consists of sawdust mixed and resin. The resin is then compressed into large blocks. It's often used for home renovation projects. Both types of boards can be easily cut and are durable.
How do you know which tools are the best for you?
It is important to consider your needs and preferences when shopping for tools. Are you more comfortable with plastic or metal handles? What size screws or nails do you prefer? Are you comfortable with power tools, or would you rather use hand tools?
Where can I buy woodworking supplies?
You can find everything you need in many places. You could shop at your local hardware store or go online to Amazon.com.
You might also consider flea markets and garage sale for any old furniture or other materials you could reuse.
How long does a piece take to finish?
It depends on the type and complexity of your design as well as the amount of finishing that you use. Hardwoods, for example, require more maintenance than softwoods. Hardwoods are more expensive than other woods. But they last longer and resist moisture better. It takes between one and three months to finish a piece.
Can I make a living doing this?
Yes! In fact, many woodworkers already do. According to the U.S. Bureau of Labor Statistics, the median annual woodworker wage was $34,000 in May 2012. This is more than the national average of 31,000 per annum.
What wood items do well?
Most wooden items that are best-sellers are made from wood harvested sustainably.
Maple, cherry, mahogany walnut, teak, mahogany and maple are the most common woods for furniture.
These woods have beautiful grain patterns and colors. They are also very strong. If they are well cared for, they can last many years.
To protect wooden furniture from moisture damage, you should paint it first. This applies to all surfaces including drawers, doors, handles, and handles.
If you want to make sure that your furniture lasts as long as possible, then you should choose a paint that is resistant to water.
Use a high-quality, oil-based primer and two coats of topcoat. Depending on how often it will be worn, you may need to apply several coats.
You should avoid using aerosol paints or spray cans. These products contain solvents which evaporate quickly and leave behind harmful fumes.
Statistics
- In 2014, there were just over 237,000 jobs for all woodworkers, with other wood product manufacturing employing 23 percent; wood kitchen cabinets and countertop manufacturing employing 21 percent. (theartcareerproject.com)
- Woodworkers on the lower end of that spectrum, the bottom 10% to be exact, make roughly $24,000 a year, while the top 10% makes $108,000. (zippia.com)
- If your lumber isn't as dry as you would like when you purchase it (over 22% in Glen Huey's opinion…probably over 10-15% in my opinion), then it's a good idea to let it acclimate to your workshop for a couple of weeks. (woodandshop.com)
- The best-paid 10 percent make $76,000, while the lowest-paid 10 percent make $34,000. (zippia.com)
External Links
How To
How to make wood joints
This tutorial will demonstrate how to join two pieces together of wood. We will use the pocket hole joint, which is drilling holes in the wood to join them. If your wood has a straight grain, smooth surface, you can use this method. Try dowel joinery instead if your wood doesn't look straight. These are the steps
-
Drill Pocket Hole Joints. Start by measuring and marking the spot where the pocket hole joint will be placed. Then drill 3/4 inch deep holes into the ends of each piece of wood using a jig saw or handheld drilling machine.
-
Sand Smooth. You can sand the edges of the wood to ensure that it doesn't split.
-
Glue together. Apply glue to both sides of the wood. Allow it to cool for at least 5 minutes before you attach the pieces.
-
Clamp the Pieces Together. Once the glue has dried, clamp the pieces together so they are flush.
-
Trim Joinery. After the glue dries, trim any excess wood around your joint.
Allow enough space between pieces so you can turn them inside out.