
You must have heard that good finishes are essential for woodworking basics. It is important to use the right tools. Wooden objects can be finished to give them a shiny finish and protection. There are many 'finish' options and colors to choose from. Find out more about the various types of 'finishes' available and how to choose the best one for your project. These are some tips to help with your woodworking projects.
Drills
Drills for woodworking basics are used in many different ways. These handy tools not only drive screws, but also make wood plugs, countersinks, and saw holes. The adjustable clutch allows for the stopping of drilling when the torque required is achieved. Drum-sanding, grinding, and stirring paint are some other uses. If you're starting out in woodworking, consider getting one of these tools. They will help save time and money, while also helping you get started.
Clamps
There are many different types of clamps available for woodworking. But what is a clamp and how do I use it? To ensure that your clamps are working effectively, here are some things to remember. To maximize the life of the clamps you use, you must keep them in good condition. It means cleaning them and drying them often. Wooden and metal clamps can also be oil periodically, depending on the material. Finally, always store your clamps in a safe place, preferably in your garage or shed, to avoid accidents.
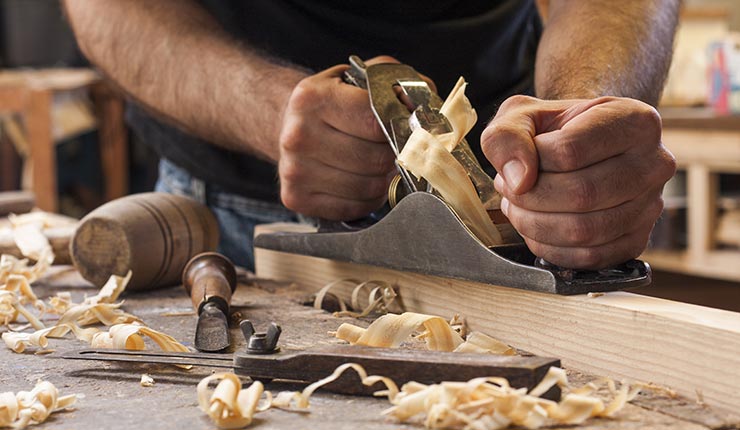
Smoothing planes
A smoothing plan is the last step in woodworking. It can be used to smoothen minor bumps and give the surface an almost flawless appearance. These smoothing planes measure 8 to 10 inches in length, and are made from European beech hardwood. They also have a durable hornbeam bottom. There are many types of smoothing plans available. For help deciding which plane is best for you, keep reading.
Glue
There are many kinds of wood glue. You may be familiar with some. Over time, you have developed methods that work with less desirable properties. Still, one day, you'll run into a project in which your preferred glue doesn't meet your bonding needs. You can then turn to catalogs and home centers to find a different brand. Here are some tips for choosing the right wood glue to suit your project.
Woodturning
If you are interested in learning the basics of woodturning, there are several things you should know before you begin. The first thing you need to remember is to wear safety gear. You should always wear leather steel-toe boots when working in a woodshop. You should also know how to inspect the lumber. It can be dangerous to turn wood that isn't in good condition. It is also crucial to select the best wood turning tool.

Scroll down
The use of scroll saws in woodworking can be traced back to the early days of civilization. Scroll saws first appeared large and could reach 10 feet in height. They were operated either by foot or pedal. Scroll saws evolved over time to be smaller and more portable. However, they all performed the same function. The scroll saw evolved into the modern scrollsaw. Scroll saws are an excellent choice for woodworkers who wish to create art pieces.
FAQ
What material would you recommend to start learning woodworking?
Start with softwoods such as pine and poplar. You will feel more comfortable with these softwoods, so you can move onto hardwood.
What is the difference between plywood and particle board?
Plywood is a combination of layers of wood, which are then pressed together under high pressure. Plywood comes in several thicknesses and is commonly used for cabinets and flooring. Particle board is made up of sawdust mixed in resin, then compressed into large pieces. It's often used for home renovation projects. Both types are sturdy and easy to cut.
Is it difficult to start my woodworking business?
It's not easy to start your own woodworking business. There are many laws and regulations you need to be aware of. However, it doesn't necessarily mean you must go through all the hassle of setting up a business. Many people prefer to join existing companies. You only need to pay membership and tax fees.
Statistics
- Average lumber prices rose about 600 percent between April 2020 and May 2021. (familyhandyman.com)
- Most woodworkers agree that lumber moisture needs to be under 10% for building furniture. (woodandshop.com)
- If your lumber isn't as dry as you would like when you purchase it (over 22% in Glen Huey's opinion…probably over 10-15% in my opinion), then it's a good idea to let it acclimate to your workshop for a couple of weeks. (woodandshop.com)
- The best-paid 10 percent make $76,000, while the lowest-paid 10 percent make $34,000. (zippia.com)
External Links
How To
Tips on how to drive a nail in wood
To drive a nail into wood, the first step is to select the right size and type hammer. The most commonly used types of Hammers are claw hammers. Each type of hammer comes with its advantages and disadvantages. A claw hammer, for example, is the best choice if you need to hit nails hard. However, it's not easy to know exactly where the impact will land. Although a sledgehammer can be used to hit large areas quickly, it is too heavy to be useful for small tasks.
After selecting the right hammer, you will need to place your hand flat against one side of the head. The handle should rest comfortably in your hands. Take the handle and hold it with both hands. But don't press down so hard you injure yourself. Hold the hammer straight up, keeping your wrist relaxed. Swing the hammer back towards the ground, with your aim at the middle of the nail. The impact of the hammer hitting the nail should be felt. If you're having trouble getting the hang of swinging a hammer, practice with a block of wood until you get the rhythm down.
When you're ready to start driving the nail, hold the hammer in front of you close to your body. You will need to position the nail so it is parallel to the wood. Your eyes should be focused on the nail's tip. Swing your hammer forward. Then follow through with the motions of the hammerhead. Keep doing this until you are comfortable with the swing. After mastering the technique, you can add power to your swings. To make it more powerful, hold the hammer up high to your shoulder and then bring it down. This will help you put more energy behind each of your moves.
Once you've nailed the first hole, remove the hammer from the nail. Use a pry bar or screwdriver to pull out the rest of the nails. To prevent splitting the wood, ensure you keep the nail heads flush against the board's surface.