
There are many tips that you can use to learn wood turning. These tips will ensure your safety while turning. To avoid common injuries when wood turning, you should follow these guidelines. After all, you don't want to end up in the emergency room with a broken arm or other serious injury. Also, make sure you are properly dressed when turning. If you don't know how to protect yourself, you can read up on safety tips on wood turning online.
Safety
Safety is an essential part of any woodturning project, just like any other hobby. Woodturning is generally safe but there are risks that must be considered. You can minimize these dangers by using safety equipment, common sense, and other sensible measures. Wearing loose clothing and jewelry is not recommended. Also, avoid distractions while operating rotating equipment. This article provides information about some of the most important safety policies for woodturners. Let's have a closer look.
It is important to properly position the workpiece on your lathe. Before using the lathe, position your workpiece at least 15 inches from the toolrest. Also, keep in mind that wood dust can cause you to slip if your toolrest is too close. If you notice the live center is becoming loose, it could be an indicator of a loosening.
Tools
A wood turning lathe is a tool that turns wooden objects. It uses two banjos. Each banjo has its own function and is critical to the operation of a lathe. This article will explain the different types of banjos and how they are used for turning wood. Let's now look at how to use the tools for woodturning. The article also discusses safety equipment for woodturners. Safety equipment is important to ensure safety while you work.
To protect your body, you should wear steel-toed boots. Wear eye and/or ear protection when handling large objects. Regardless of the type of woodturning tool you choose, it is important to protect your eyes and ears from harmful fumes. A good pair of leather steel-toe boots is recommended for all activities in the shop. Woodturning tools are also useful when preparing a blank for turning.
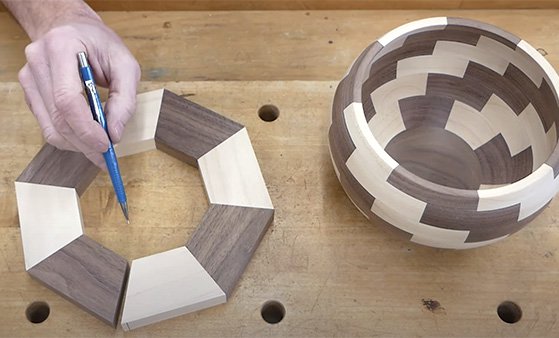
Projects
You may be curious about the types of wood turning projects that you can do. First, you need to understand the materials you can use. The Spruce states that you have the option of choosing from many different types of hardwoods. Local tree surgeons and sawmills can also provide wood. To get started, here are some projects for beginners. This project involves creating a bowl with unseasoned timber from local sources. It will take some effort, but it will be worth it.
Regardless of your skill level, woodturning is a craft that requires patience and a lot of practice. Woodturning projects are easy to modify, even though they don't require much skill or experience. Woodturning is a great hobby that can help you relax and improve your mental clarity. You can find many online resources that will help you get started. Step-by-step tutorials are available online to help you get started.
Attire
It is dependent on the project that you are turning wood, which will dictate what kind of attire you need. Full-face sunglasses will provide better protection against flying objects, while safety goggles work well for most tasks. Safety goggles with steel feet are best if you plan to use a grinder. You should also wear eye and ear protection. Toe-toe leather boots should be worn.
Wood turning requires that you wear a comfortable cotton shirt and a turned baseball cap. If you are going to be working on a piece of wood for long periods, you should avoid wearing loose clothing around the spinning object. Make sure to remove any jewelry, and tie back your hair to avoid catching on it. You will also need paper towels to remove wood shavings.
Dust masks
There are many options for dust masks to use in wood turning. These masks can be fitted with filters or cartridges to help reduce moisture and heat. These masks can also be purchased in pads that you place over your nose and mouth. Some masks are made with elastic or rubber straps and fit over the nose and mouth. These protect you from fumes, dust, and dirt. You should consider purchasing a powered mask if you are unable wear one.
Other types of wood turners wear masks that have a high degree of filtration. The 3M-8210 particulate respirator, is one of these. It filters out 95% of the particulate matter in the air and comes in a box of 20. Although dust masks for woodturning can be expensive, they will protect your lungs from any respiratory problems. A 20-piece box contains the 3M8210.
Respirator
A respirator can be worn while turning on the lathe to protect your face as well as your lungs. A powered face shield respirator for woodworking is an excellent choice. Powered face shields are great for noisy and dusty operations. Woodturning creates lots of dust and shavings. These can fly at your face. Standard safety glasses will not protect your eyes from flying debris. The debris from an accidental bowl drop could cause significant damage to the chuck's eyes.
FAQ
What wooden items do you sell well?
These wooden products are the most popular. They were made from sustainably harvested wood.
Maple, cherry, mahogany walnut, teak, mahogany and maple are the most common woods for furniture.
These woods are extremely strong but also have beautiful colors and grain patterns. If they are well cared for, they can last many years.
To prevent moisture damage, wood furniture should always first be painted. This includes all surfaces, including drawers, doors, and handles.
A paint that resists water is the best choice to ensure that furniture lasts a long time.
You should use a high-quality oil-based primer followed by two coats of top coat. It is possible to apply multiple coats depending on how heavy the wear.
Avoid spray cans or aerosol colors. These products can evaporate quickly and emit harmful fumes.
How can you calculate woodworking pricing?
Remember to keep costs as low as you can when calculating project costs. You should always try to make sure that you are getting the best deal on materials. It's also worth taking into account all the other factors that may affect the cost of your projects, such as time, skill level, and experience. Check out our guide on the average cost of common DIY projects to get an idea of how much you can spend on woodwork projects.
Can I make my living doing this job?
Yes! In fact, many woodworkers already do. According to the U.S. Bureau of Labor Statistics in May 2012, the median annual income for woodworkers was $34,000 This is higher than the $31,000 annual national average.
Where do I start with woodworking?
Building furniture is the best way to learn how furniture is made. Although you will need to have tools and may make mistakes along your journey, you'll soon be able to master it.
First, choose a project you would like to complete. You can make a simple box or a large entertainment center. After you have decided on a project to work on, contact a local woodworker that specializes in this type of work. Ask the local woodworker for help in deciding what tools and where to get them. Perhaps you could ask if there is someone else who does this type of work.
What else should I know about woodworking in general?
It is easy for people to overlook the work involved in furniture making. Finding the right wood is the hardest part. It is difficult to choose between the various types of wood.
A problem is that wood doesn't have the same properties. Some woods will warp over time, others will split or crack. You must take these things into consideration before purchasing wood.
Statistics
- If your lumber isn't as dry as you would like when you purchase it (over 22% in Glen Huey's opinion…probably over 10-15% in my opinion), then it's a good idea to let it acclimate to your workshop for a couple of weeks. (woodandshop.com)
- In 2014, there were just over 237,000 jobs for all woodworkers, with other wood product manufacturing employing 23 percent; wood kitchen cabinets and countertop manufacturing employing 21 percent. (theartcareerproject.com)
- Average lumber prices rose about 600 percent between April 2020 and May 2021. (familyhandyman.com)
- The best-paid 10 percent make $76,000, while the lowest-paid 10 percent make $34,000. (zippia.com)
External Links
How To
Tips for driving a nail in wood
When driving a nail into wood, it is important to first choose the correct size and kind of hammer. There are many types of hammers that you will find: claw hammers and sledgehammers; mallets; ball peen hammers; and hatchets. Each type of hammer has its pros and cons. A claw hammer is best for hitting nails or hard objects. However, it can be difficult to pinpoint exactly where the blow will land. A sledgehammer allows you to hit large areas simultaneously, but it is too heavy and cumbersome to use for small tasks.
After choosing the right hammer, place your hand flat against the side of the head so that the handle rests comfortably in your palm. Hold the handle in your hand, but don’t force it too hard that you break. Hold the hammer straight up, keeping your wrist relaxed. Swing the hammer back towards the ground, with your aim at the middle of the nail. You should feel the impact on the nail from the hammer. Try swinging a hammer using a block wood to practice until you are comfortable.
When you're ready to start driving the nail, hold the hammer in front of you close to your body. Place the nail so that it is perpendicular with the wood's surface. Keep your eyes focused directly on the tip of the nail. Swing the hammer forward, then follow through with the motion of the hammerhead. Continue this motion several times, slowly increasing the speed of each swing. Once you've mastered the technique, try adding power to your swings. Try holding the hammer above your shoulder and bring it down forcefully. This way, you'll be able to put more energy behind your blows.
Once you've nailed the first hole, remove the hammer from the nail. You can then remove the rest of the nails using a prybar or a screwdriver. Keep the nail heads parallel to the board's surfaces in order to avoid splitting wood.